Create a Next.js static site with Wordpress and GraphQL (WP GraphQL + Next.js, part 1)
- nextjs
- wordpress
- graphql
In this tutorial, we will create a JAMstack app by connecting three quite different libraries. On the backend, there is the old champ WordPress, tuned up by Roots. On the frontend, there is the prodigy, Next.js. Between those two, there is a great invention from, erm… the minions? (cough): GraphQL.
As it turned out, these three, despite being of different ages and speaking different languages, got along really well. Let’s give it a try!
Prerequisites
This tutorial assumes that we have some experience with both WordPress and React (not necessarily Next.js). It also assumes that we have already installed Composer and that we have some kind of LAMP stack development environment (e. g. XAMPP, Laragon or Local) set up. We will also need to either create a new MySQL database for our WordPress project or use an existing one.
On the Next.js part, I will use yarn as a packet manager. While I was a longtime satisfied npm user, I switched to yarn because it was able to get around some nasty node-gyp issues. But feel free to use whatever packet manager you like (just update the commands accordingly).
Why Bedrock?
Bedrock is an open source boilerplate for WordPress development. It significantly improves the developer experience and makes WordPress development feel quite up to date. It fully leverages the advantages of Composer by making WordPress and its plugins modules that can be easily installed and updated from a command line. It also stores the configuration in separate .env files, which makes the configuration and version control much easier. The folder structure is also improved (user data like uploads are separated). After trying Bedrock, I definitely don’t want to go back to “out of the box” WordPress.
Install and Set up New WordPress/Bedrock Project
First, let’s create a new Bedrock project:
composer create-project roots/bedrock
In our freshly created project root directory, there is an .env file. Unlike the ‘vanilla’ WordPress release, where the sensitive data are basically ‘hardcoded’ in the config.php file (which brings the problem of version control), Bedrock follows the ‘modern’ approach where the sensitive data are stored in the environmental variables. Let’s open the file and update it with our database credentials. Also, unlike ‘vanilla’ WordPress, our site’s base url is stored here as WP_HOME (which makes switching environments much smoother). Let’s update it as well. Last but not least, it is definitely a good practice to generate the cryptographic salts, which are also stored in the .env file.
Install the Plugins
After installing and setting up our project, let’s open its root folder and install the WP GraphQL plugin, also using Composer. Let’s open the composer.json file (it’s in the root directory) and add wpackagist-plugin/wp-graphql to the list of dependencies (under required), like that:
// composer.json

// ...
"require": {
  "php": ">=7.1",
  "composer/installers": "^1.12",
  "vlucas/phpdotenv": "^5.3",
  "oscarotero/env": "^2.1",
  "roots/bedrock-autoloader": "^1.0",
  "roots/bedrock-disallow-indexing": "^2.0",
  "roots/wordpress": "5.8.1",
  "roots/wp-config": "1.0.0",
  "roots/wp-password-bcrypt": "1.0.0",
  "wpackagist-plugin/wp-graphql": "^1.6"
},
// ...
After adding the WP GraphQL plugin to a list of dependencies in composer.json, we have to run the update command. Composer will download and install the plugin and all its dependencies:
composer update
Let’s test if everything is working fine. Let’s get started with our development environment. We need to point our server to a web subdirectory, which is a distinction from ‘vanilla’ release. The ‘admin’ urls are also slightly different—they are prefixed by /wp/ segment, so https://example.com/wp-login.php is now https://example.com/wp/wp-login.php. This can cause some issues when importing an existing database and the rewrite rules do not match. I was able to solve that issue by creating a .htaccess file with the default rewrite rules and saving it to the web directory.
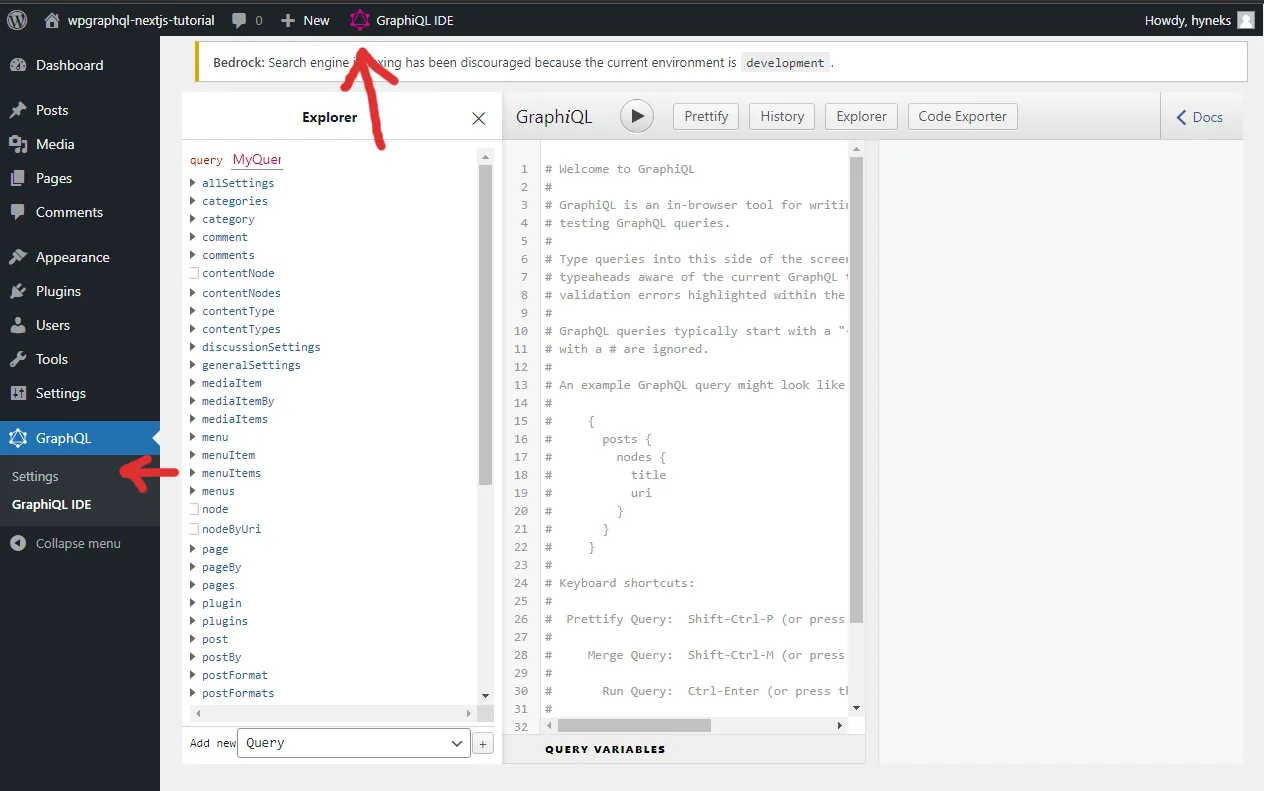
Hopefully, everything went well, and we successfully installed a new WordPress instance. Let’s log in to our admin pages and activate the WP GraphQL plugin. A GraphQL link should appear in the sidebar, and a GraphiQL IDE link should appear on the upper bar:

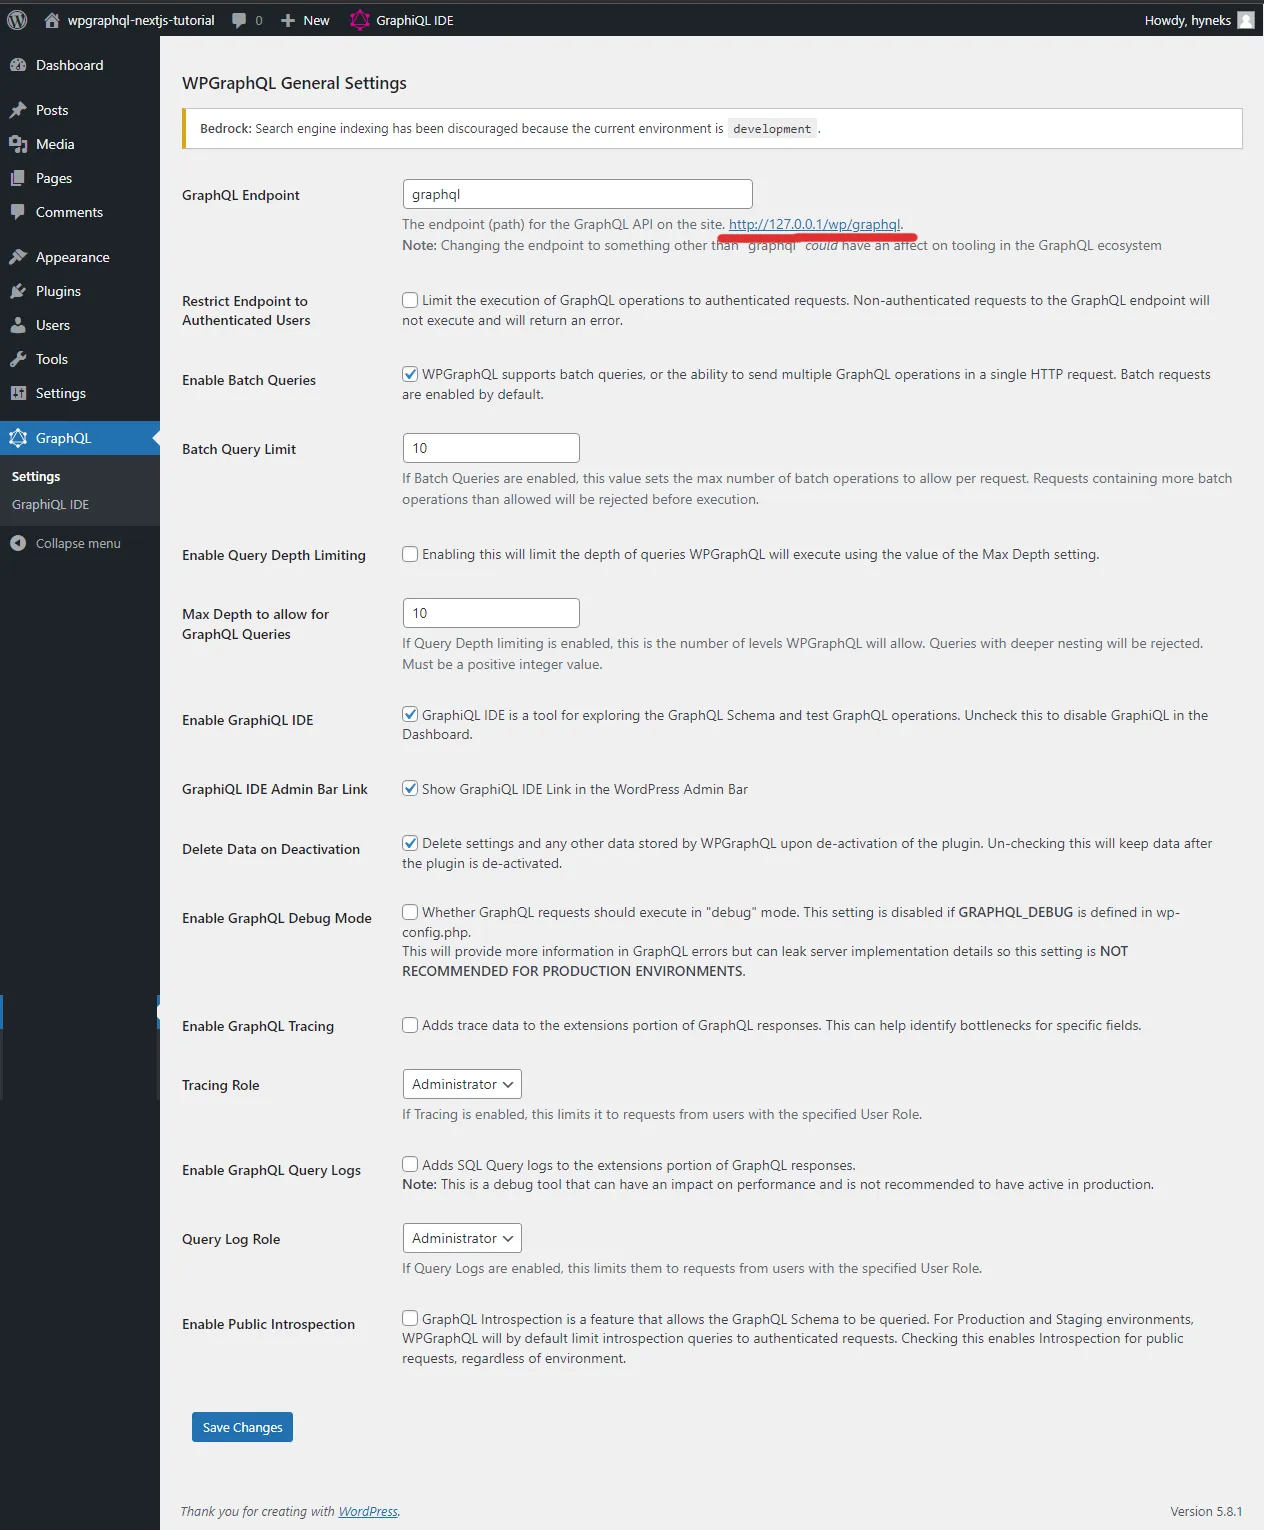
Also, check the plugin settings (see image below). We didn’t need to change any of the defaults. Just notice the ‘GraphQL Endpoint’ option, because we will need this later while querying the data from our Next app.

One more thing: Right now, if we use a fresh new install with an empty database, there is barely any data to query (just the default “Hello World” post), which is kind of dull. Let’s create more posts! We’ll use the ‘Faker Press’ plugin.
// composer.json

// ...
"require": {
  "php": ">=7.1",
  "composer/installers": "^1.12",
  "vlucas/phpdotenv": "^5.3",
  "oscarotero/env": "^2.1",
  "roots/bedrock-autoloader": "^1.0",
  "roots/bedrock-disallow-indexing": "^2.0",
  "roots/wordpress": "5.8.1",
  "roots/wp-config": "1.0.0",
  "roots/wp-password-bcrypt": "1.0.0",
  "wpackagist-plugin/wp-graphql": "^1.6",
  "wpackagist-plugin/fakerpress": "^0.5"
},
// ...
And we’ll install the plugin the same way as the first one:
composer update
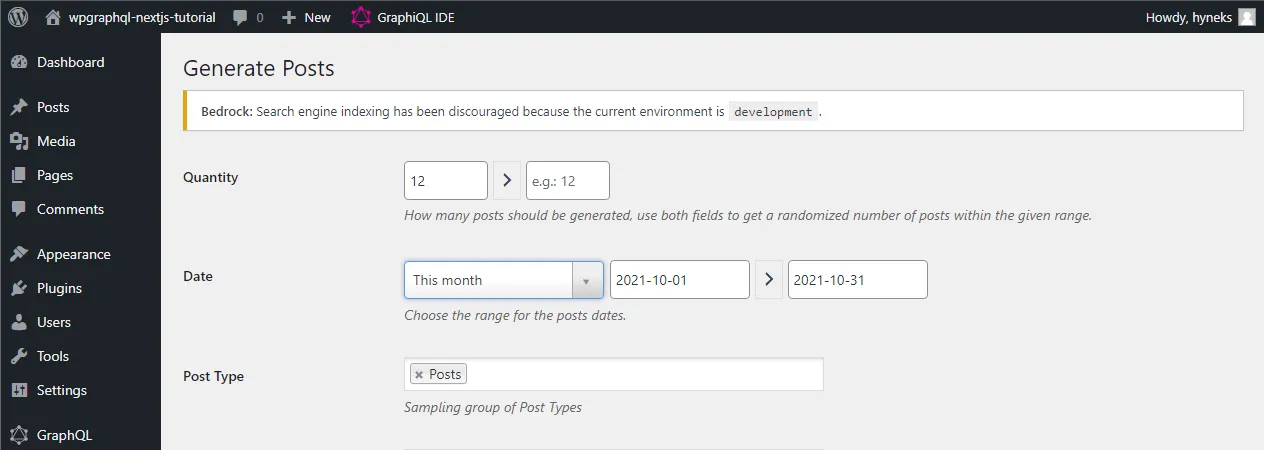
When the plugin is installed and activated, the ‘FakerPress’ menu item appears on the sidebar. Let’s go to the ‘posts’ submenu and create some posts. I did create 12 posts for “this month”, but feel free to change that settings. I would only suggest making some posts.

Install Next.js
Now, that WordPress is set up, it is time to install Next.js. It really doesn’t matter, where we install it; it can be completely separated from WordPress. For the sake of simplicity, let’s install it in the root directory of our project, so it will look like this:
wordpress-next-app/
  ├── bedrock/
  └── nextjs/
I would recommend already setting up a TypeScript project (by using the --typescript flag), even though we will use only plain Javascript in this tutorial and all possible TypeScript complaints will be silenced. The actual typing (especially the typing of GraphQL queries) will be the topic of the second part of our tutorial.
yarn create next-app --typescript
Create a Basic Api
In our Next.js project we create a new directory, lib, and in this library, a new file, api.js (you can go straight for TypeScript and make it api.ts, but the compiler will likely complain about some any parameters—you can mute it for now using the // @ts-nocheck on the top of the file). This file will contain a function that we’ll use for querying the graphql endpoint created by the WP GraphQL plugin.
// lib/api.js

const API_URL = process.env.GRAPHQL_API_URL;

export async function fetchAPI(query, { variables } = {}) {
  const headers = { "Content-Type": "application/json" };

  const res = await fetch(API_URL, {
    method: "POST",
    headers,
    body: JSON.stringify({ query, variables }),
  });

  const json = await res.json();

  if (json.errors) {
    console.log(json.errors);
    console.log("error details", query, variables);
    throw new Error("Failed to fetch API");
  }
  return json.data;
}
Great, we have a fetcher function. Now, we need some actual queries. If you’ve worked with GraphiQL IDE before, you know that one of its cool features is the ability to construct a query by just checking the sidebar items. Our first query will select the title and slug of our posts:
// lib/api.js

const API_URL = process.env.GRAPHQL_API_URL;

export async function fetchAPI(query, { variables } = {}) {
  // ...
}

// posts are 'latests' because by default WP GraphQL exposes the last 10 posts
export async function getLatestPostsLinks() {
  const data = await fetchAPI(`
    query LatestPostsLinks {
      posts {
        nodes {
          title
          slug
        }
      }
    }
  `);
  return data?.posts;
}
Create a Home Page
While we have our first query prepared, we need to actually use it somewhere. Let’s open the index.tsx file from a /pages folder. For the sake of simplicity, we’ll delete the current content and replace it with a very straightforward example:
// pages/index.tsx

const Home = () => {
  return (
    <div>
      <h1>Our WordPress/Next app Home Page</h1>
    </div>
  );
};
Beautiful, isn’t it? Well, probably not. Let’s add some styles to make it look acceptable, at least. There are some useful open source CSS libraries for basic HTML element styling, such as Basic.css and spcss. There is a styles folder in the root dir of our Next.js app, containing a globals.css file. Let’s open it and replace all of its contents with one of the linked files from github. Last but not least, put a single remaining selector with a few rules taken from 58 bytes of css to look great nearly everywhere article (NOTE: Unfortunately, the link seems to be currently broken):
/* ... Basic.css rules */

#__next {
  max-width: 70ch;
  padding: 2ch;
  margin: auto;
}
So where were we? All right, the query. We will use the getStaticProps function, which is quite versatile and works not only for static sites generation (SSG), but for client and server side rendering (CSR/SSR) as well. The get static props will call our prepared fetcher function to get the data. For now, we will utilize the JSON.stringify() method to display the actual data.
// pages/index.tsx

import { getLatestPostsLinks } from "./../lib/api";

const Home = ({ latestPosts } = {}) => {
  const { nodes } = latestPosts;

  return (
    <div>
      <h1>Our WordPress/Next app Home Page</h1>
      <pre>{JSON.stringify(nodes, null, 2)}</pre>
    </div>
  );
};

export async function getStaticProps() {
  const latestPosts = await getLatestPostsLinks();

  return {
    props: {
      latestPosts,
    },
  };
}

export default Home;
Those of us who are using TypeScript may notice a complaint about an unclear prop type. For now, just tell TypeScript to ignore the file using @ts-nocheck directive. We will add typing later—in the second part of this tutorial.
// pages/index.tsx

// @ts-nocheck
import { getLatestPostsLinks } from "./../lib/api";

const Home = ({ latestPosts } = {}) => {
  //...
};

//...
Try our api
All right! For now, first check if the WordPress environment is running. You can do a simple test of the GraphQL endpoint by simply trying to visit its url (e.g., http://127.0.0.1/wp/graphql). You should get a page with a JSON object containing an error caused by missing arguments, like that:
{"errors":[{"message":"GraphQL Request must include at least one of those two parameters: \"query\" or \"queryId\"","extensions":{"category":"request"}}],"extensions":{"debug":[{"type":"DEBUG_LOGS_INACTIVE","message":"GraphQL Debug logging is not active. To see debug logs, GRAPHQL_DEBUG must be enabled."}]}}
But this is totally expected, and it actually means that everything on the WordPress side is working fine. So let’s start our Next.js dev server:
yarn dev
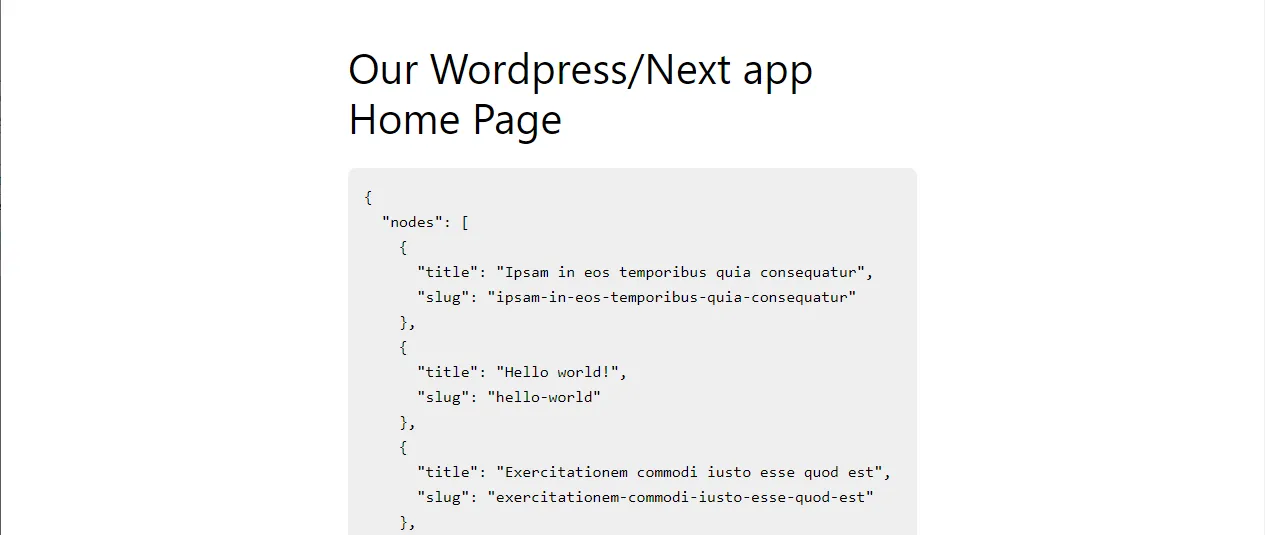
Hopefully, we can see our first query result:

It doesn’t look bad, but we want actual links, no just a JSON list of them. Let’s import a Link component and create some… no surprise, links:
// pages/index.tsx

// @ts-nocheck
import Link from "next/link";

import { getLatestPostsLinks } from "./../lib/api";

const Home = ({ latestPosts } = {}) => {
  const { nodes } = latestPosts;

  return (
    <div>
      <h1>Our WordPress/Next app Home Page</h1>
      <ul>
        {nodes.map((node) => (
          <div key={node.slug}>
            <Link href={"posts/" + node.slug}>{node.title}</Link>
          </div>
        ))}
      </ul>
    </div>
  );
};

export async function getStaticProps() {
  const latestPosts = await getLatestPostsLinks();

  return {
    props: {
      latestPosts,
    },
  };
}

export default Home;
Now we should see a page with a list of links to our posts. But clicking any of these links gives us a 404 error page. We need to create a template for displaying our posts.
Create a Post template
Let’s create a /posts subfolder under /pages directory. In that directory, create a [slug].tsx file.
nextjs/
  ├── pages/
  │   ├── posts/
  │   │   ├──[slug].tsx
The slug inside brackets can be seen as a variable, a prop, that will be eventually replaced with an actual value. To do that, we will use another function from Next.js, getStaticPaths.
We’ve added a new function to our api, that will query all posts that have a slug. It is very similar to our first query, but we specify a quite high exact number of queried items (WP GraphQL is quite restrictive about a large amount of data queried at once to prevent “server meltdowns”):
// lib/api.js

const API_URL = "http://127.0.0.1/wp/graphql";

export async function fetchAPI(query, { variables } = {}) {
  // ...
}

export async function getLatestPostsLinks() {
  const data = await fetchAPI(`
    query LatestPostsLinks {
      posts {
        nodes {
          title
          slug
        }
      }
    }
  `);
  return data?.posts;
}

export async function getAllPostsWithSlug() {
  const data = await fetchAPI(`
    query AllPostsWithSlug {
      posts(first: 100) {
        nodes {
          slug
        }
      }
    }
  `);
  return data?.posts;
}
Now, let’s create a template for our post. For now, the post itself will be shown as a JSON string (we will improve that soon). The getStaticProps function is very similar to that that we used before; it is just calling a different fetching function with a distinct query (see above ☝).
What is new here is the getStaticPaths function. What does it do? It builds a list of paths (or relative urls, if you wish) that will point to our new Post template. It also utilizes a fetcher function, which gets the post nodes with slugs. Then, we simply map over the nodes and construct the paths:
// pages/posts/[slug].tsx

// @ts-nocheck
import { getAllPostsWithSlug, getPost } from "../../lib/api";

const Post = ({ post }) => {
  return (
    <div>
      <pre>{JSON.stringify(post, null, 2)}</pre>
    </div>
  );
};

export async function getStaticProps(context) {
  const { slug } = context.params;
  const post = await getPost(slug);
  return {
    props: {
      post,
    },
  };
}

export async function getStaticPaths() {
  const allPostsWithSlug = await getAllPostsWithSlug();
  return {
    paths: allPostsWithSlug.nodes.map((node) => `/posts/${node.slug}`) || [],
    fallback: false,
  };
}

export default Post;
Hopefully, we can see our post—but only as a JSON string. Let’s make it pretty, and let’s add a link to a homepage so we can browse our posts easily:
// pages/posts/[slug].tsx

// @ts-nocheck
import Link from "next/link";

import { getAllPostsWithSlug, getPost } from "../../lib/api";

const Post = ({ post }) => {
  return (
    <div>
      <Link href="/">Back to Homepage</Link>
      <h1>{post.title}</h1>
      <time dateTime={post.date}>{new Date(post.date).toDateString()}</time>
      <div dangerouslySetInnerHTML={{ __html: post.content }}></div>
    </div>
  );
};

export async function getStaticProps(context) {
  // ...
}

export async function getStaticPaths() {
  // ...
}

export default Post;
Generate a static site
Great job! Now, let’s leverage the Next.js SSG feature and make our site statically generated and super fast. First, let’s install a simple http server made by creators of Next.js, serve (this is optional; you can use any server of your choice, or install it on-demand using npx, but then you’ll need to properly modify the following scripts).
yarn global add serve
When the serve is installed, let’s open the package.json file and add two scripts (this is optional; if you are a UNIX-based shell user, you can run them directly):
// package.json

// ...
  "scripts": {
    "dev": "next dev",
    "build": "next build",
    "start": "next start",
    "lint": "next lint",
	  "export": "next build && next export",
    "static": "next build && next export && cd out && start http://localhost:5000 && serve -p 5000"
  },
  // ...
The export script combines the build script (which creates a production build that can be server-side rendered) and the export script (which takes the production build and creates a fully static site out of it). The static command adds three more steps: it navigates to the /out directory, where the static build is located; it opens the default browser on http://localhost:5000 and it starts the http server pointing to that port.
Let’s try it:
yarn static
Now, hopefully, our fully static, blazingly fast site is running at http://localhost:5000.
What’s next?
If you are in the mood, you can try to enhance this project by yourself, e.g.:
- by creating a collection of WordPress pages, a
[slug].tsxtemplate for them, and linking them on the homepage, - by adding a new menu to the homepage after creating one in the WordPress admin pages.
This tutorial has a second part, where we will learn how to add auto-generated types to our queries and use them in our templates.
👍 Enjoy!
If you find anything in this post that should be improved (either factually or in language), feel free to edit it on Github .